You know what I love watching?
Our sales team's faces light up when they realize they don't have to manually create deals after every successful meeting. That moment when they understand that all those little post-meeting tasks – the data entry, the deal creation, the field updates – just happen automatically? Pure gold! 😄
After seeing hundreds of RevenueHero’s customers implement this, this is a playbook that I think everyone should implement.
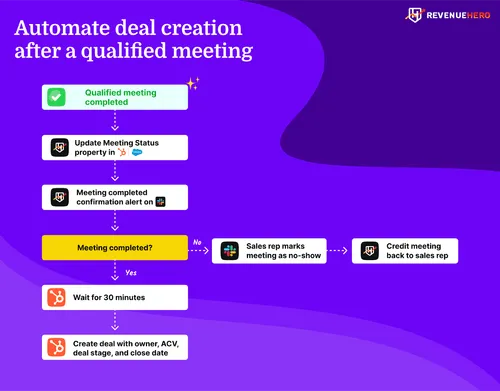
Today, I'm going to walk you through exactly how to build a workflow that turns every completed meeting into a perfectly structured deal, automatically.
Why this playbook matters more than you think
Let me paint you a picture of what happens without this automation. Your star sales rep just crushed a demo. The prospect loved it. But then... your rep gets pulled into another call. Then another. Suddenly it's 5 PM, and that hot opportunity from this morning? Still sitting in meeting-land, not yet converted into a deal.
Your marketing team is unsure about what happened to the lead. Your CRM has outdated data. And your reports are still in red.
Sound familiar?
This is the playbook you need to get rid of all those nightmares.
Let's build your post-meeting money machine
1. Ensure meeting outcomes for qualified prospects are automatically updated in your CRM
One of the reasons RevOps folks dread automatically creating a deal is the reliance on reps to manually update every single field in the CRM.
Let's tackle that problem by automating the logging of meeting activities for your qualified prospects in your CRM (in this case, HubSpot).
What you'll need:
- A RevenueHero account connected to your HubSpot CRM
- A form
- HubSpot admin access
Once you've integrated your RevenueHero account with your HubSpot CRM, you can now connect your form to a RevenueHero router to present prospects who submit the form a scheduling option right away.
To connect your form to a RevenueHero router, in your RevenueHero account:
- Navigate to Inbound
- Create new router
- Map your form to RevenueHero and choose how these form properties are stored upon syncing with HubSpot.
- Setup Matching rules to ensure that existing accounts/contacts are routed to the same sales rep.
- For net new qualified contacts, choose how you want to route meetings amongst your sales team through distribution rules.
- Choose your prospect's experience after the scheduling experience and share the Javascript snippet for your web developer to add after the form to which you connected RevenueHero router.
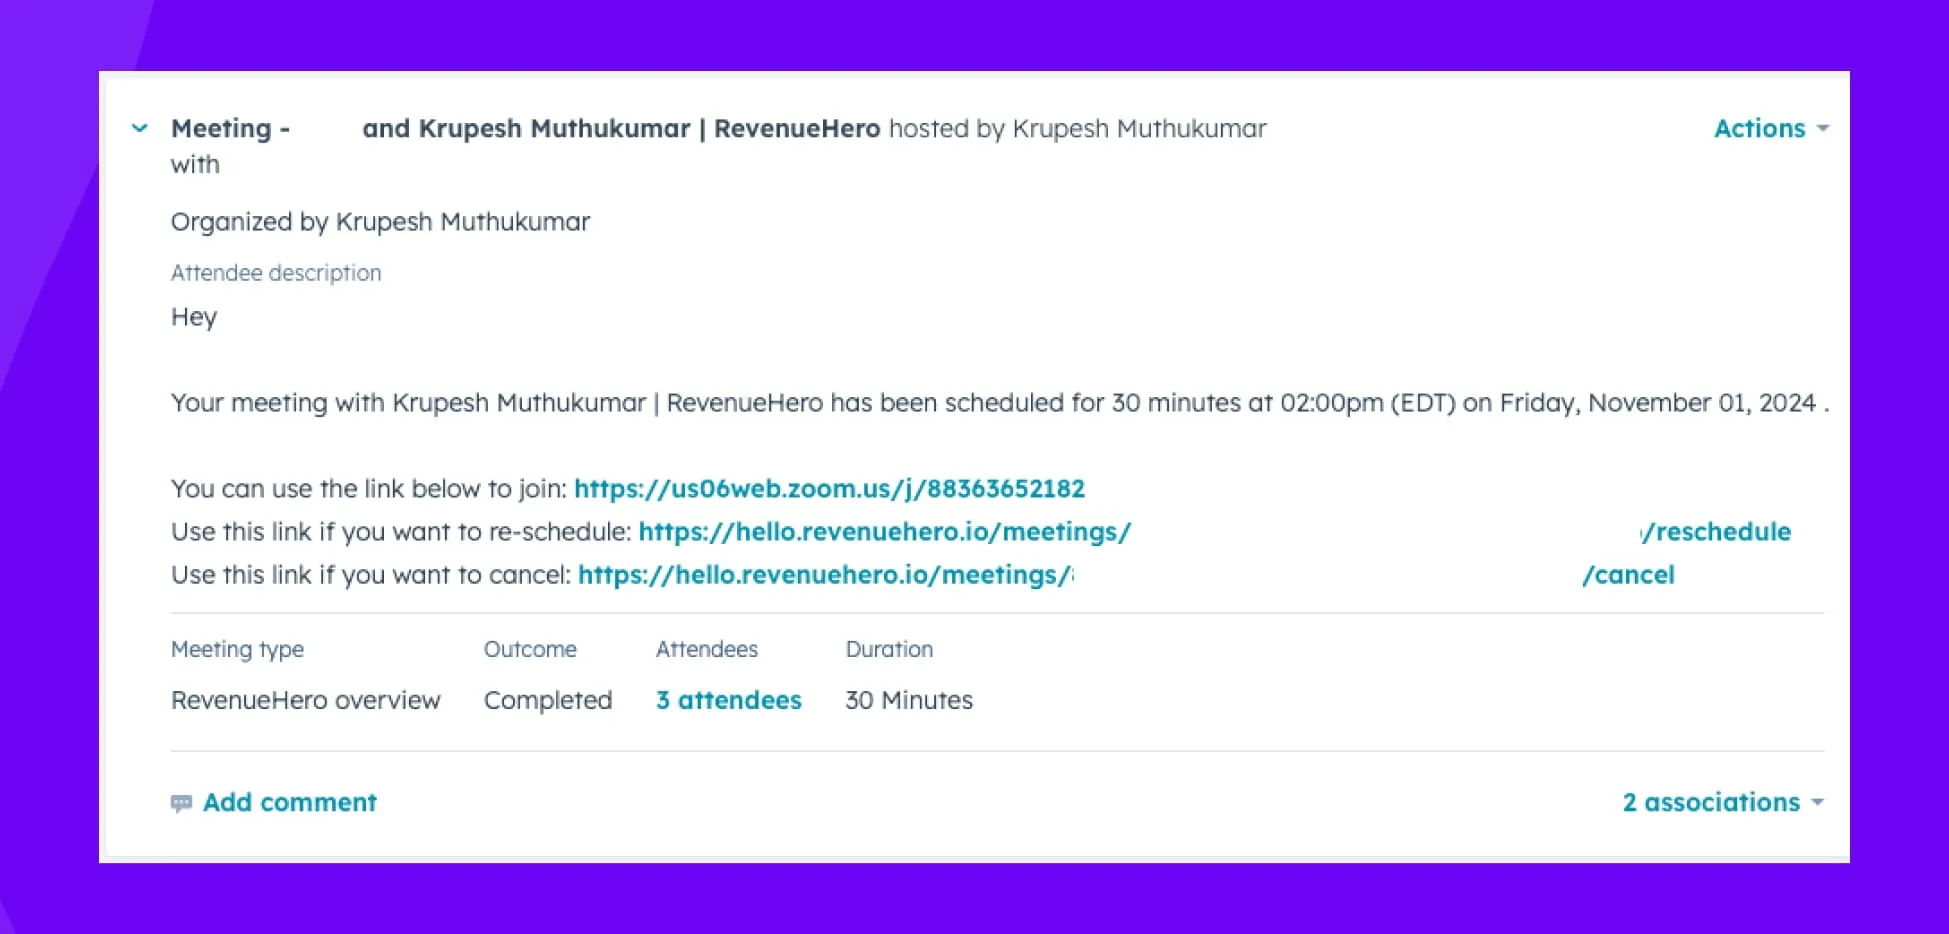
Once this is done, you now have a setup where every form fill sends data to RevenueHero and for every form interaction RevenueHero creates:
Meeting activity against the contact with the all the properties below for prospects who book a meeting:
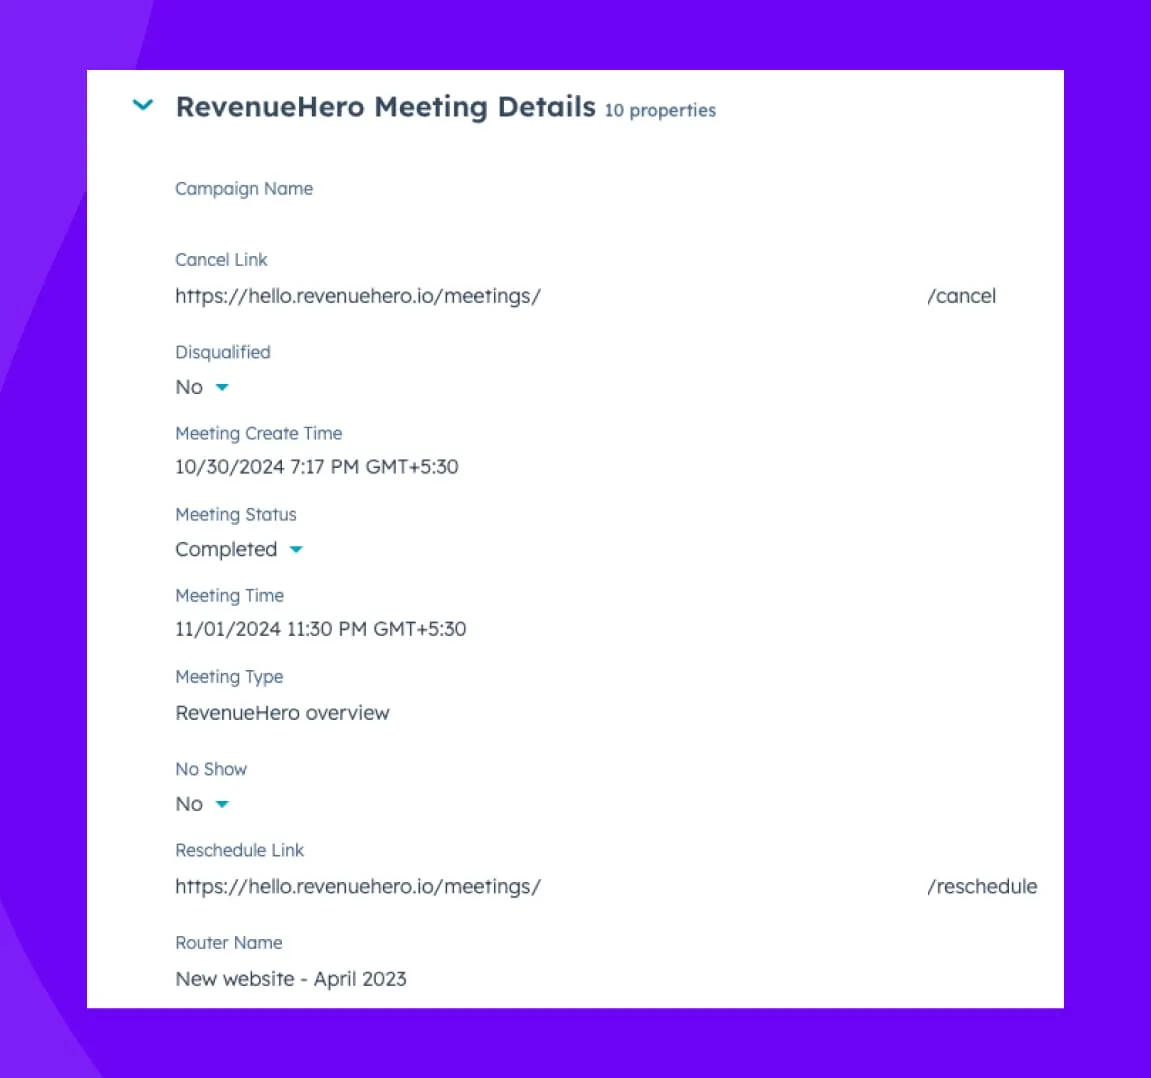
Contact property updates for every prospect (those who book a meeting and those who don't):
2. Meeting completed? Or was it a No-Show?
We’ve written about how to increase meeting show rates before. But despite our best efforts, sometimes prospects don’t show up for the meeting.
RevenueHero incentivizes your sales reps to mark no-shows if meetings don’t occur by automatically marking all meetings that lapse their time as completed. If meetings don’t get marked as no-show, your reps know RevenueHero won’t credit that meeting back and put them back in the round-robin.
We can trigger a workflow inside RevenueHero that alerts the sales reps on Slack that the meeting was marked as “Completed”. However, if the prospect was a no-show, sales reps can mark the meeting as “No Show” directly from within Slack.
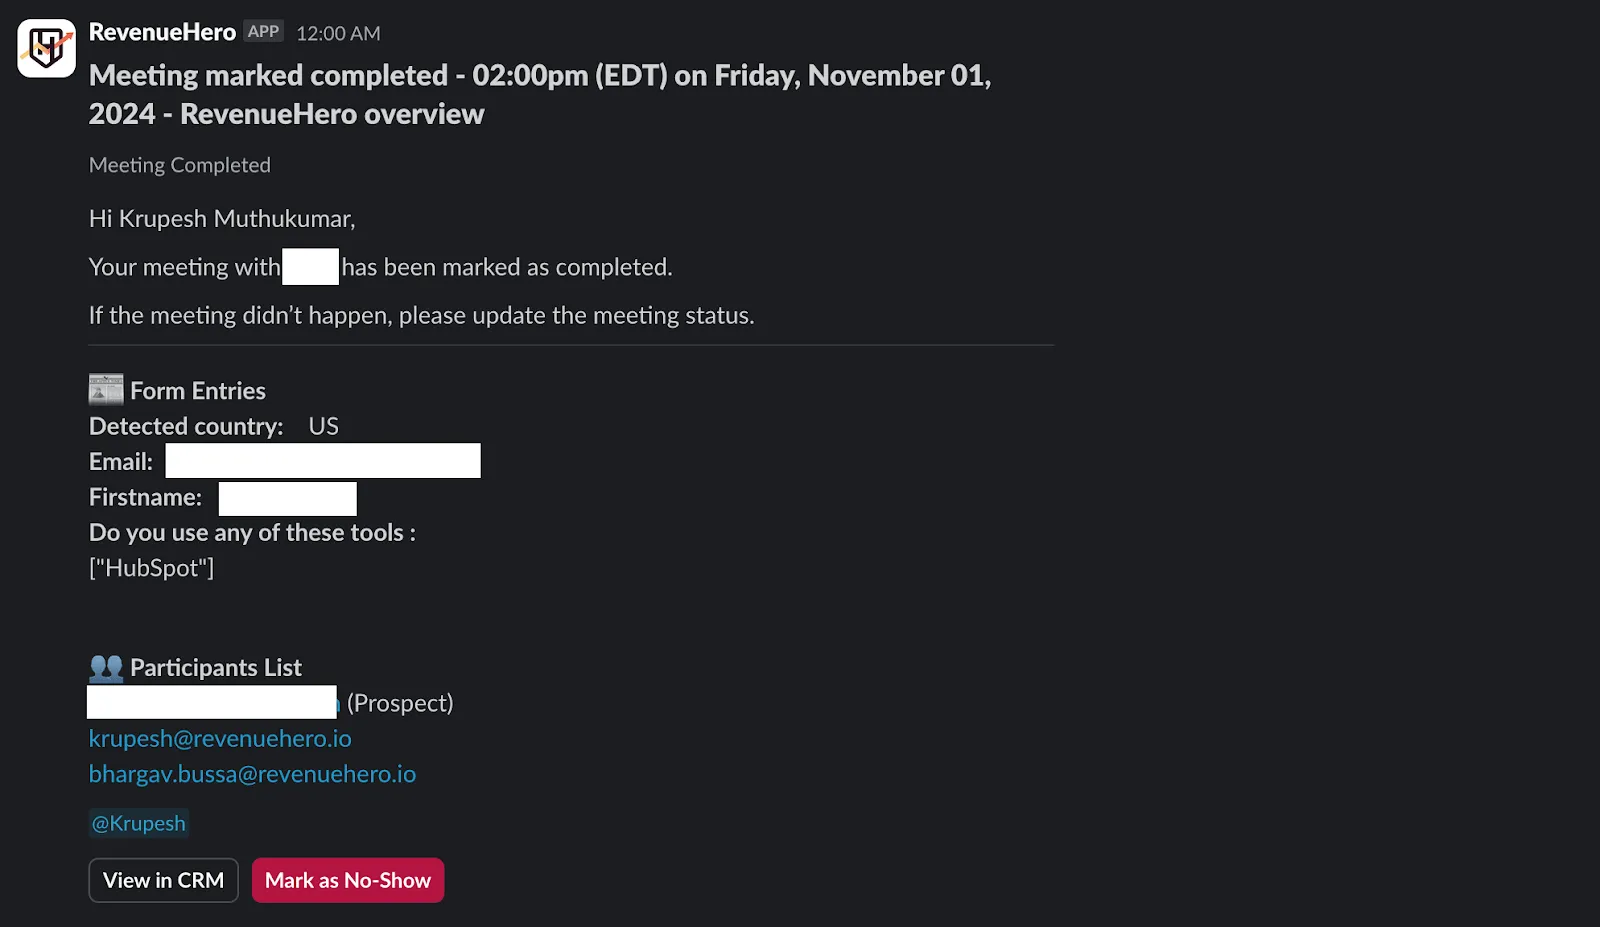
All your sales reps have to do is click on “Mark as No-Show” button and this will automatically get synced to your CRM.
To set this up,
- Head over to “Workflows” inside RevenueHero
- Click “Add Workflow” from the top-right corner
- Set the trigger as “When a meeting completed”.
- You can customize the trigger further to trigger this alert for all meeting types or for only specific meeting types
- Select the action as “Send message to Slack channel”.
- Customize the message you want to send as a part of the alert.
- Give your workflow a name, and hit “Create Workflow”.
Setting up this workflow ensures that your CRM always has the latest meeting outcomes on every prospect, which is critical information we’ll use to automate deal creation.
3. Setting up the perfect trigger in HubSpot
To automate the deal creation, we’ll first need to set up some triggers inside HubSpot’s workflows. This tells our workflow exactly when to spring into action.
Here’s a quick sneak peek of what the workflow will look like inside HubSpot:
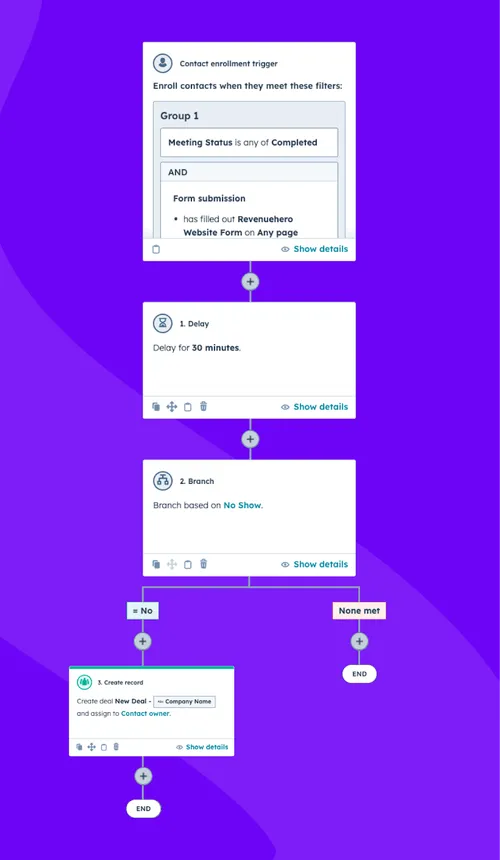
Your trigger should be looking for two specific things:
Meeting Status is "Completed"

AND

Form submission from "Your Website Form Name" on Any page
Since only qualified prospects can book a meeting through RevenueHero and RevenueHero automatically marks the meeting status as “Completed” after the meeting time lapses, you’ll always have the latest information on your meeting outcomes without having to rely on manual inputs.
Since we want to create a deal only for folks who requested a demo and booked a meeting, we’ll include form submission criteria also in the trigger.
A word of caution: You might be tempted to add more conditions here. Resist that urge! I've seen teams try to get too fancy with their triggers. Keep it simple. At least at the start. You can always add more sophisticated routing later.
4. The 30-minute delay
Next up is our delay step in HubSpot.
Since we don’t want any deals created for no-shows, we’ll create a 30-minute delay to give our sales reps enough time to mark a prospect as no-show from the Slack notification we set up in step up.
5. Create a branch condition
Now that we’ve given our sales reps 30 minutes to confirm if the prospect showed up for the meeting, let’s create a branch condition in our HubSpot workflow.
In this condition, we’ll check to see if the property “No Show” is marked as “No”. This tells us that the prospect attended the meeting. If your sales rep marked the prospect as “No Show” in the Slack alert, this value will be set as “Yes”.
6. Deal creation: The heart of the operation
This is where the magic happens. We’ll add the “Create record” action under the “= No” branch. This way, the deal will get created only if the prospect attended the call.
Here's the exact deal configuration you need:
Deal Name: "New Deal - {{Company Name}}"

Stage: "S0 - Form fill/Calendared meeting (Your Pipeline Name)"

Owner: Contact owner

Close Date: 35 days from workflow run

Amount: $5,000
Let's dive into why each of these fields matters:
Deal Naming Convention
Using "New Deal - {{Company Name}}" might seem simple, but it's intentional. This format:
- Makes deals instantly searchable
- Maintains consistency across your pipeline
- Helps with duplicate prevention
- Makes reporting cleaner
Owner Assignment
Assigning to the contact owner maintains relationship continuity. The rep who did the meeting should own the deal – this isn't just about organization, it's about accountability and relationship building.
Close Date
When setting the close date, I recommend set it as “X Days” after action running where X is your average sales cycle. Of course, you can always nudge your sales reps to edit this when the deal moves to the next deal stage.
Deal Amount
For the deal amount, I recommend setting your ACV as your starting amount and when your reps have more information (hopefully by the time the deal moves to the next stage), they can update the deal amount. It might seem arbitrary, but it serves several purposes:
- Gets deals out of $0 territory (the forecasting black hole)
- Sets a baseline for pipeline calculations
- Makes it easier to spot deals that haven't been properly updated
Wrapping up
There you have it – your blueprint for automatically creating deals for every qualified meeting, all while making your sales team think you've got RevOps superpowers (cape optional, but recommended 😉).
Remember, this isn't just about automating busy work. It's about creating a seamless experience that lets your sales team focus on what they do best – selling – while you handle the backend magic that keeps everything running smoothly.
Ready to implement this in your own setup? Start small, test thoroughly, and don't forget to celebrate when those perfectly created deals start flowing in automatically!
.svg)


 PRO TIP
