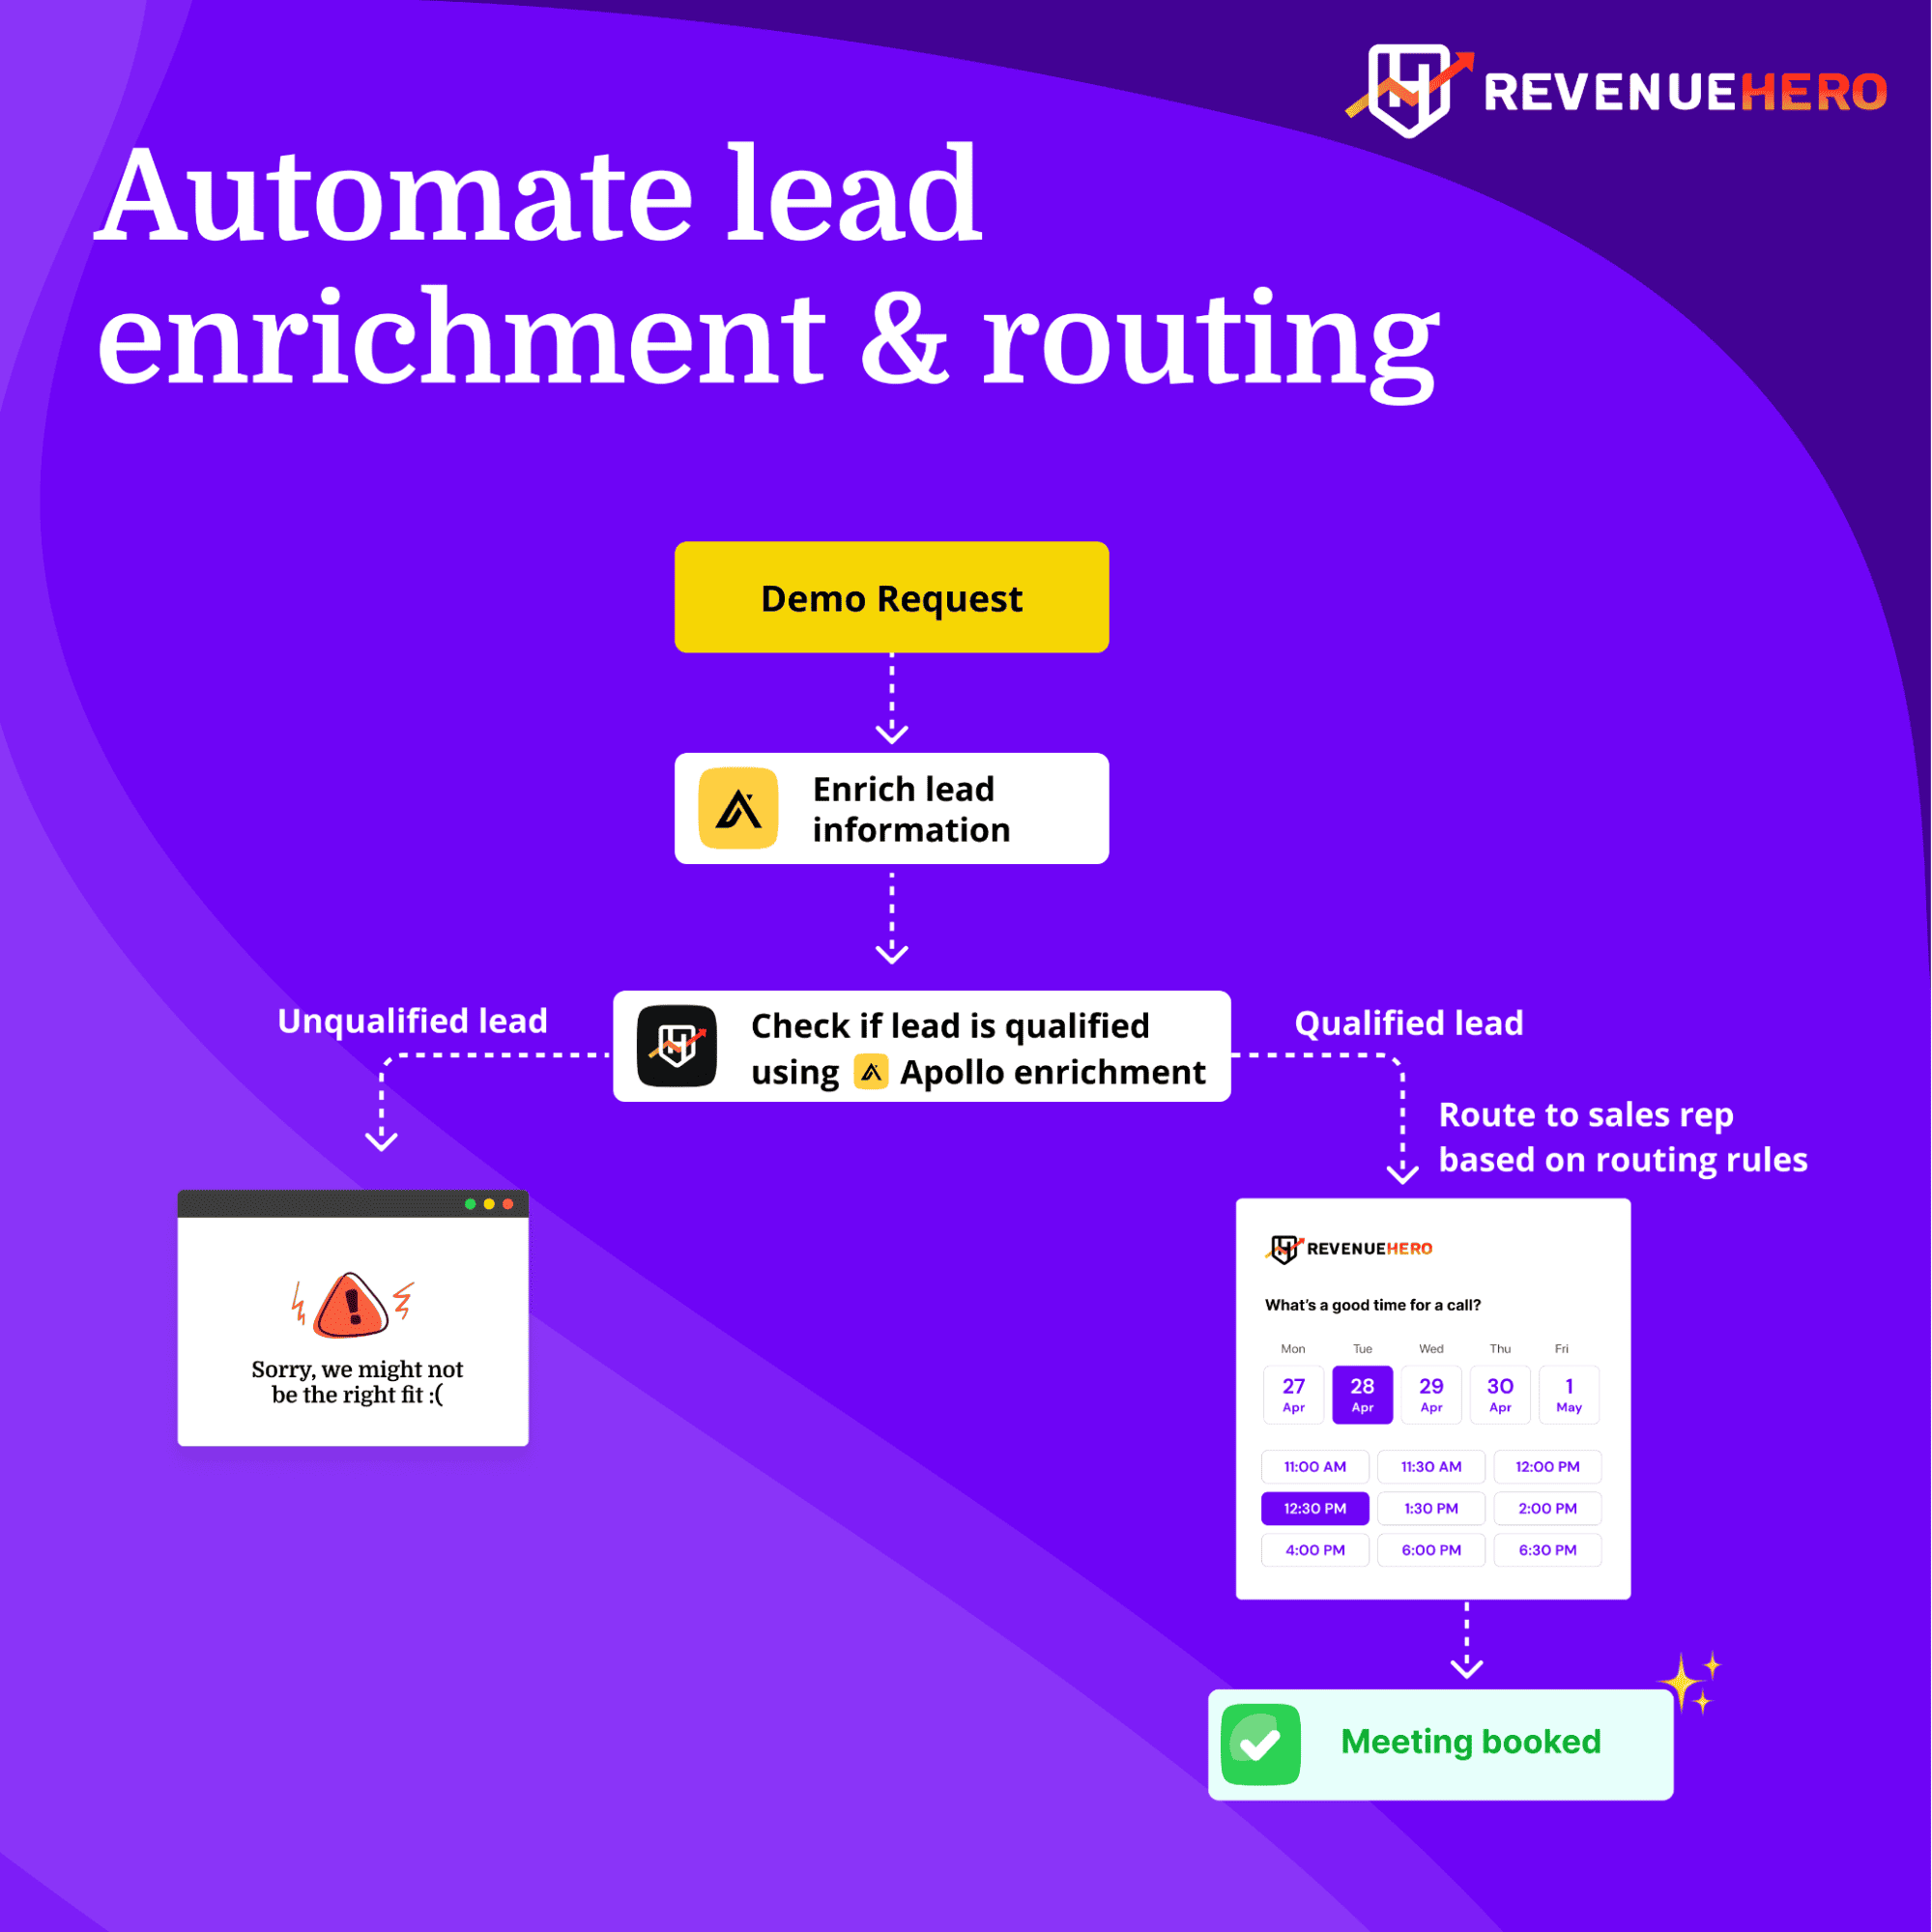
Imagine a world where every lead that fills out a form on your site lands in your CRM complete with HQ location, employee count, and industry — before your team even looks at it.
This world isn’t a fantasy; it’s what happens when Apollo and RevenueHero team up.
This playbook covers the setup from end to end. We’ll break down each step, from form creation to field mapping to integration, so you can get leads into your team’s hands faster—and better prepared.

Step 1: Set up your web form with hidden fields
Hidden fields let you store enriched data directly within the form. Your visitors won’t see these fields, but they’ll act as placeholders for important details like HQ location and employee count.
In HubSpot, create a form and ensure the following two fields are hidden:
- Company HQ Location: This field will hold the primary office location.
- Employee Size: This field captures headcount — a core qualifier for most B2B teams.
Map each hidden field in your form to its HubSpot counterpart. Double-check that hq_location in the form links directly to hq_location in HubSpot, and the same for employee_size.
These mappings ensure that every enriched piece of information moves directly from Apollo, through your form, into HubSpot, where your sales team can access it instantly.
Step 2: Generate an Apollo API key
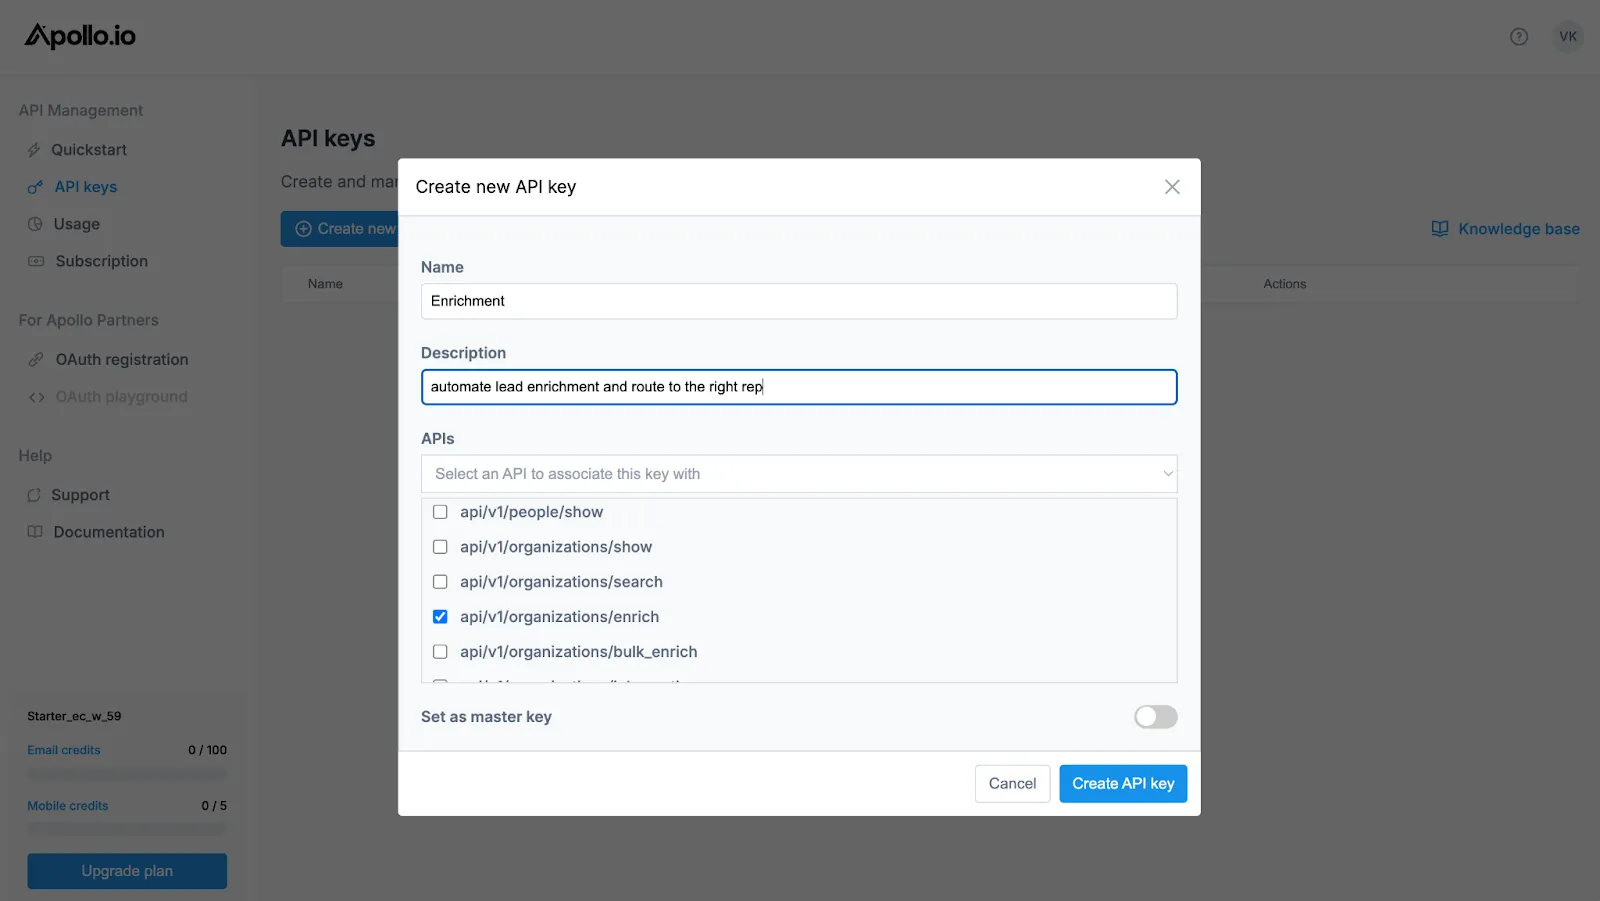
Apollo’s enrichment API is where the data magic happens. The key will connect your form to Apollo’s vast data resources, filling in fields based on email alone. Here’s how to get it set up:
- Go to “Settings > Integrations > API Keys” in Apollo.
- Select “Create New Key”, and name it something descriptive like "Lead Enrichment API".
- Enable “Organizations Enrich” permissions to pull in company details.
- Copy and secure this key — you’ll need it soon.

Next, to find your Apollo API URL, head over to Apollo’s API docs and select “Organization Enrichment” from the left nav. You’ll find the API URL right below the “Organization Enrichment” title as shown in the image below.

Step 3: Mask your API key with NoCodeAPI
Unfortunately, Apollo does not mask their API key. Leaving your API key exposed is a security risk, especially if it’s embedded on your website. This is where NoCodeAPI comes into the picture. It masks your key to keep it safe.
Here’s how to set it up:
- Head to NoCodeAPI and create a free account.
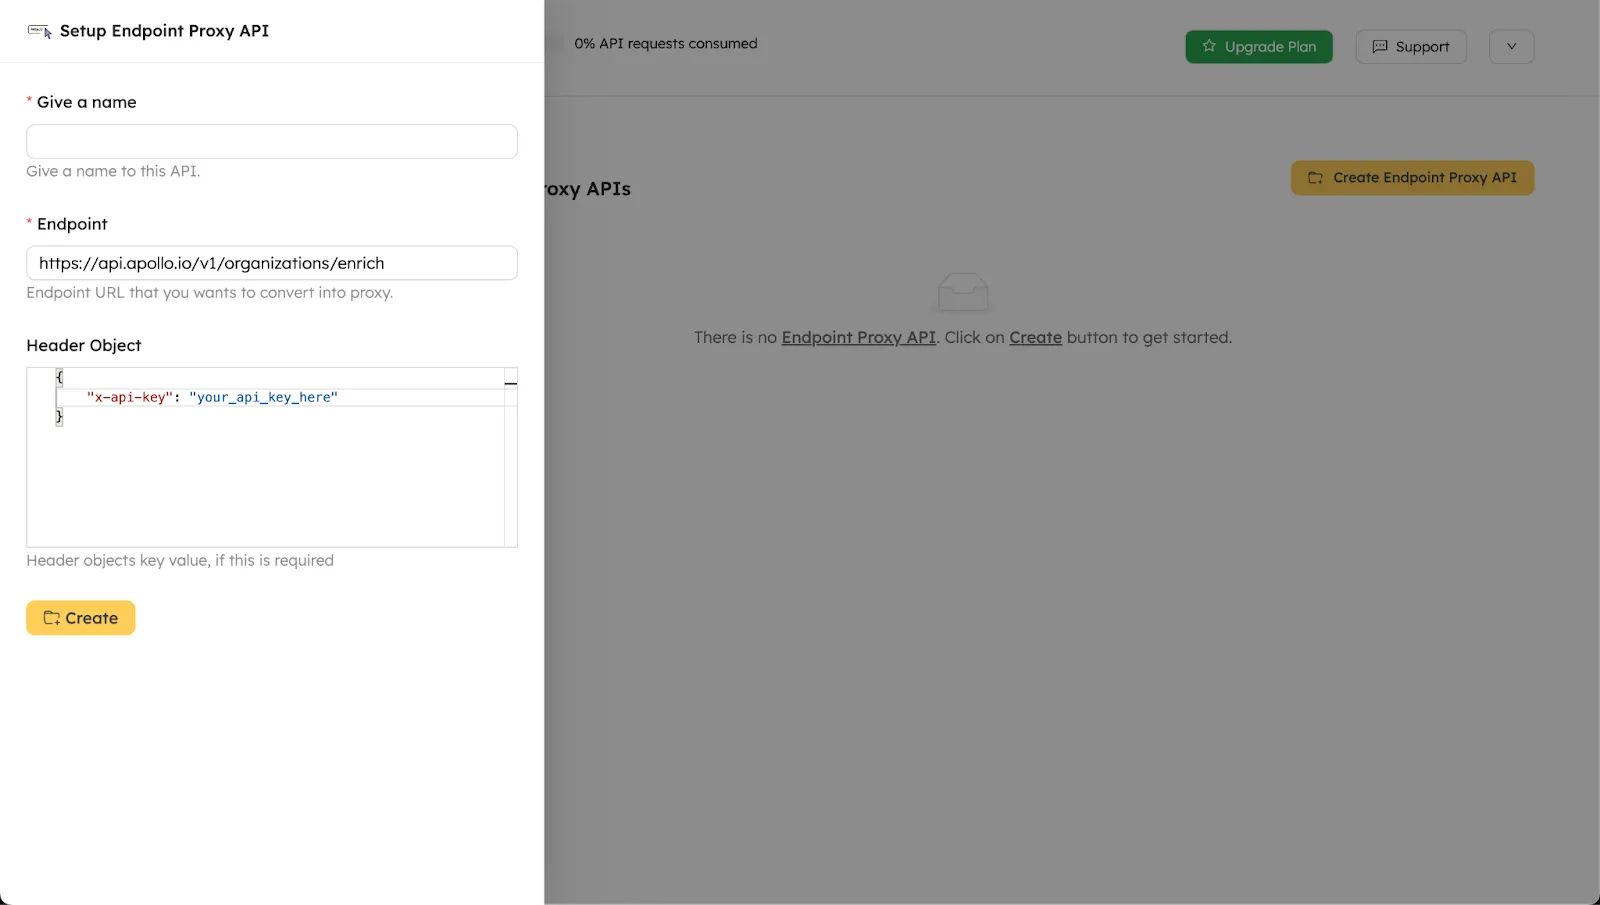
- Once logged in, choose “Endpoint Proxy” in the marketplace and activate it.
- Paste your Apollo API URL into the “Endpoint” field.
- Enter your API key in the “Header Object” similar to how it’s shown in the image below.
- Name this connection something straightforward, like "Apollo Enrichment Proxy".

This will give you a unique URL to use in place of your Apollo API key, ensuring the connection remains secure while making data available as soon as a lead fills out their details.
Step 4: Embed the API call
With the Apollo API securely masked, it’s time to pull everything together. Here’s how:
- Add a JavaScript snippet to your form that detects when a user fills out the email field.
- Trigger the API call through NoCodeAPI whenever someone exits the email field. This call will fetch company details from Apollo.
- Populate the hidden fields: With the data from Apollo, the script will automatically fill in fields for HQ location and employee size.
Here’s a code snippet to get you started:
<script type="text/javascript">
// Find the form on the page
const demoForm = document.querySelector("#form-id");
// We'll enrich when email has been entered
demoForm.querySelector("[name='email']").addEventListener('blur', function(ev){
const emailValue = ev.target.value;
// Run enrichment if valid email
// Can make this a stricter validation if needed
if(emailValue.includes("@")) {
const emailDomain = emailValue.split("@")[1];
// Paste the NoCodeAPI URL here
fetch(`https://v1.nocodeapi.com/abcdef/ep/ebcdef?domain=${emailDomain}`, {
method: "GET"
}).then(function(response) {
// Save the response status in a variable to use later.
fetch_status = response.status;
// Handle success
// eg. Convert the response to JSON and return
return response.json();
}).then(function(enrichmentInfo) {
// Check if the response were success
if (fetch_status == 200) {
// Use the converted JSON
console.log(enrichmentInfo);
// If enrichment value is found
if(enrichmentInfo?.organization) {
// [Todo] Set values for fields
demoForm.querySelector("[name='employee_size']").value = enrichmentInfo?.organization?.estimated_num_employees;
demoForm.querySelector("[name='hq_country_apollo']").value = enrichmentInfo?.organization?.country;
}
}
})
}
});
</script>
This script will automatically enrich each form submission, leaving you with fully populated lead details before anyone on your team even picks up the phone.
Refer Apollo’s docs over here to see which values can be enriched.
Step 5: Integrate with RevenueHero’s Routing Logic
Now that we’re getting the enriched data into your form’s hidden fields (and inside your CRM), we can set up RevenueHero to use values from these hidden fields to qualify/disqualify and to route to the right rep.
To get this going, you’ll need the following order of scripts:
- Form Script: This script collects data when the form is filled out.
- Apollo Script via NoCodeAPI: This script enriches the data fields with Apollo’s API.
- RevenueHero Script: This script reads the data and routes the lead to the appropriate rep based on the HQ location, employee size, and other qualifiers.
This layered approach ensures that every bit of data is captured, processed, and handed off seamlessly.
To get RevenueHero’s script, here’s what you’ll need:
- A RevenueHero account connected to your CRM
- CRM admin access
- Your form already implemented on your website
A RevenueHero account connected to your CRM instance, automates the following:
- Automated matching on scheduling interactions with existing records at an account, contact, and lead level
- Instant meeting activity logging against the contact
- Automated meeting outcome tracking for the logged activity
- Latest meeting status updated at a contact property level
Once you've integrated your RevenueHero account with your CRM, you can now connect your form to a RevenueHero router to present prospects who interact with the CTA a scheduling option right away.
To connect your HubSpot form to a RevenueHero router, in your RevenueHero account:
- Navigate to “Inbound” and click on “Create new router”
- Map your HubSpot form to RevenueHero. Don’t worry, RevenueHero automatically does this for you. All you need to do is enter the URL of your page where you’ve got your demo request form.
- Next, you’ll setup Matching rules to ensure that existing accounts/contacts are routed to the same sales rep. Here’s a playbook we wrote on lead to account matching to give you an idea.
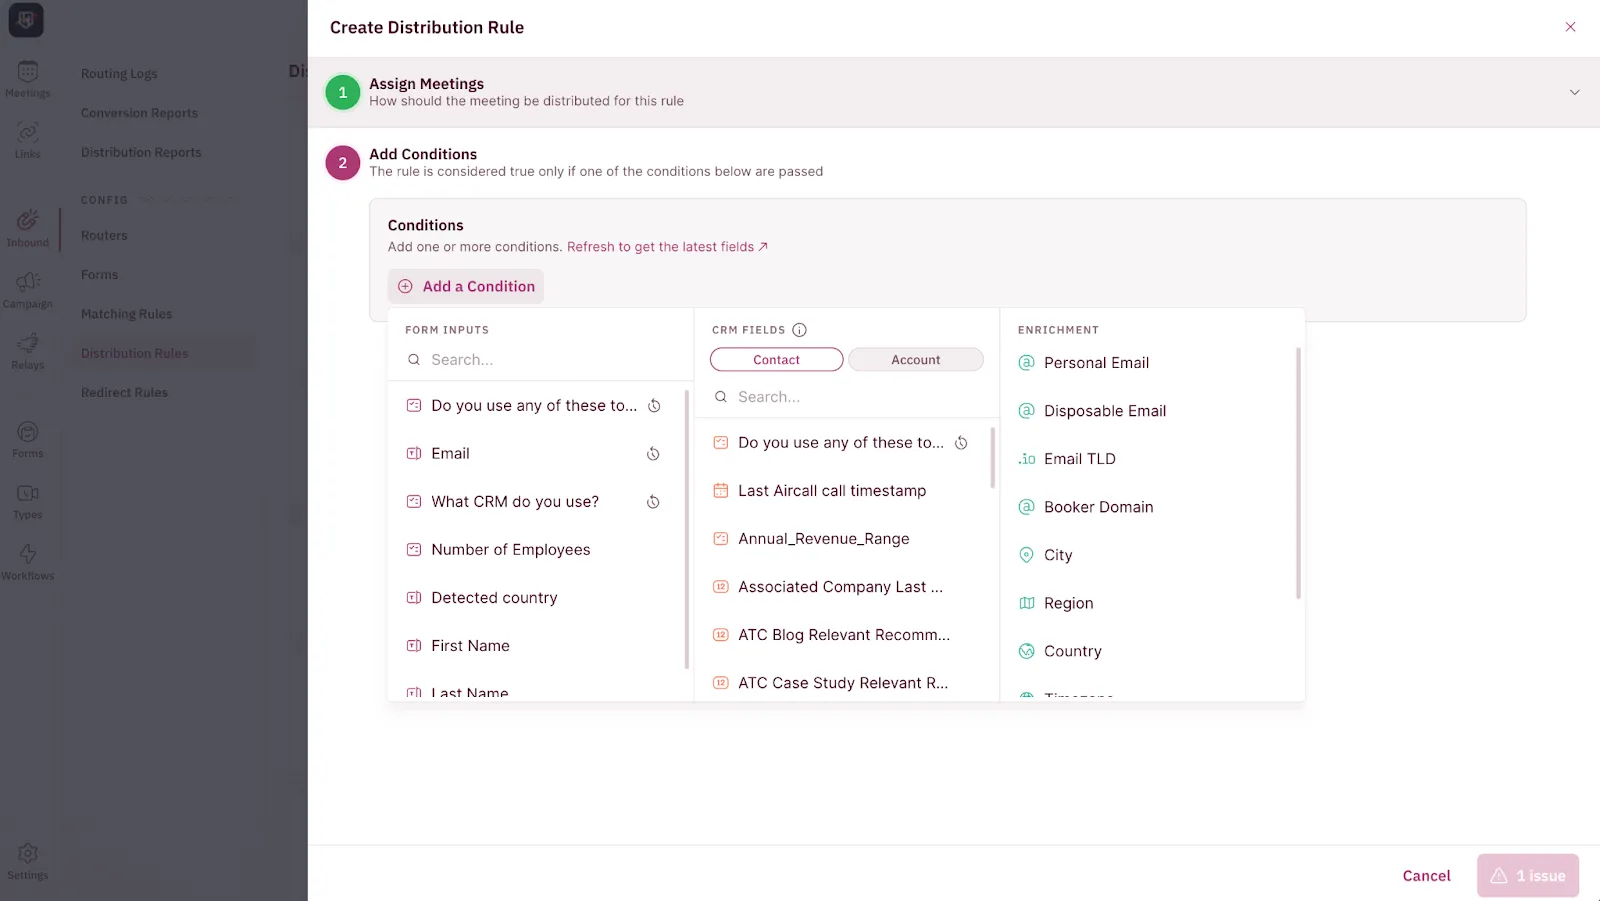
- For net new qualified contacts, choose how you want to route meetings amongst your sales team through distribution rules (here’s a playbook). Don’t forget to use one of your hidden fields while setting up conditions for your routing logic. You’ll see them under “FORM INPUTS”.

- Choose your prospect's experience after the scheduling experience and share the Javascript snippet for your web developer to add after the HubSpot form to which you connected a RevenueHero router.
Step 6: Test, Test, and Test Again
No RevOps setup is complete without thorough testing. Here’s a checklist to make sure everything’s working as planned:
- Use test emails from different domains and check that data like HQ location and employee size fills in as expected.
- Since you’re testing HQ location and employee size, using test emails might not work all the time. If this is the case for you, consider setting this playbook on a landing page that doesn’t get high volume.
- Check HubSpot to confirm that all data is moving to the right fields.
- Validate RevenueHero’s routing by checking RevenueHero’s routing log to see if qualified leads are being routed correctly based on location and company size.
If anything’s amiss, double-check your field mappings and make sure each script is in the right order. Minor field mismatches are usually the culprit when things go wrong.
Wrapping up
With Apollo and RevenueHero in tandem, you’re building a machine that handles enrichment and routing automatically. For a RevOps leader, this setup is a major time-saver and a massive step towards cleaner CRM, better conversion rates, and higher sales efficiency.
It turns every form submission into a fully enriched contact, ready to be qualified or disqualified, and routed automatically to the right sales rep to close deals faster.


 PRO TIP


